I had the opportunity to take part in a contest with Wilton. Wilton is the premier brand of cake decorating and baking products. The contest was to create your own original cake pops. I bet you are wondering what a cake pop is? It is cake on a stick dipped in delicious candy melts. I really want to show you all how to make cake pops. I decided that I would use my adorable little boy as my inspiration for deciding what to make. Noah loves everything having to do with transportation, that’s what I would do. I would make a few of his favorites in to a delicious treat. Since he truly loves them all, picking which ones to do was somewhat difficult. So, I went to the source and asked Noah, he wanted rocket ships, submarines and cranes. He also mentioned blimps but, unfortunately the blimps were too warm and it was like the Hindenburg disaster.

I received a Cake Pops kit from Wilton to help me get started in my first cake pop adventure. Since I am left handed and tried to decorate Noah’s cakes before I was very nervous as they didn’t turn out very pretty. I had confidence in myself and along with my trusty and adorable assistant we were ready to hit the kitchen and start creating. First thing we did was use The Cake Pops on A Stick book to make the special recipe for the cake part. Noah really helped a lot; he poured everything in for me and even helped to stir it all up complete with construction vehicle noises. Once it was baked and cooled, we crumbled the cake.

I can honestly say that was Noah’s favorite part. He told me before we started baking that he was going to make me in to a cake pop and tickled me and said crumble crumble crumble. It was very cute. It was fun to crumble the cake up. My Grandma Rose always said that your best tools are your hands, and I agree completely.
After we crumbled it we added some icing and mixed it up with our hands. I had bought my favorite cake mix and frosting on clearance for 42 cents since it was green holiday icing, we looked like swamp things after we were done. I had to remind Noah, many times not to try and eat it all off his hands.


I decided to let it chill for a bit to firm up some, which was a great idea because it was pretty messy before. Once it was firm enough to shape without making a mess. I started making the shapes for the rocket ships, blimps, cranes, and submarines. I put them back in the refrigerator for a couple hours before I dipped the 6 inch sticks in melted Candy Melts to help them stick. Since my cake pops were bigger than the average cake pop I was worried that it would fall off if it didn’t have enough time to chill. I left them in the refrigerator for 24 hours, just to make sure.

I was ready to dip them with my new Chocolate Pro Electric Chocolate Melter. I melted some more red Candy Melts being careful that I wouldn’t waste them, when I was ready for the next color after washing some of the candy melts down the sink, I figured out if I poured the leftovers on parchment paper and let it dry I could reuse it. It peeled off really easily and I also figured out that you have to melt quite a bit to get easy coverage on your Cake Pop. I was able to make it work easily with a spatula on the bottom of the pops so they were completely incased in Candy Melt. It doesn’t take the Candy Melt very long to harden which was a good thing. I dipped the Red Rocket Ships and the Yellow Submarines first. I let Noah pick the colors all of them, since I bought every color of Wilton Candy Melts they had at the craft store.
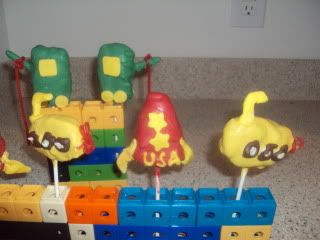
I have always wanted to try out fondant and I thought no time like the present since I wanted to add specific details. I purchased several packages of colored ready to use fondants. I ended up using yellow fondant on all of the Cake Pops. I had also used some little cutters in different shapes. It was really easy to roll out even for me. My crowning achievement was when I put the yellow candy melts in a disposable icing bag and wrote USA on the rocket ships. It is legible even. I am not sure if Julia Child was guiding my hands like in the movie Ghost or what but it was perfect. I was so afraid that the rocket ships were going to be drizzled in yellow candy melt. Thankfully, that wasn’t the case. I was so proud of myself at that moment.
I decided to make the wings of the rocket ship out of fondant. I used yellow fondant as the periscope of the submarine as well. I had some trouble thinking of what to use for the windows on the submarine. I was going to first use the candy eyes that were included in my pops kit turned backwards, that didn’t work too well so, I thought marshmallows would work. I decided to rip them and shape them for the windows. After attaching them I decided, it looked weird so, I melted some white candy melts and put those in a disposable icing bag and drew the windows on. I thought they really needed the porthole covers around them too. I used some melted chocolate chips in another disposable icing bag. Melted chocolate chips are a different consistency than the Candy Melts so it was harder to manage. Noah reminded me that submarines have propellers so I used some pull and peel licorice that I had purchased for the cranes to make it. By that time I had poured out the yellow Candy Melt to harden so I just kind of dipped the back of the pop in the yellow melts and attached the licorice. Two down two to go I thought to myself. I was doing this and it was working for me.

When it was time for the blimps I went to dip them and since they had been sitting out for a hour or more they were no longer cold. I almost started to cry after I watched the Cake Pop fall apart. I was thinking, it’s ok I have two more blimps. I didn’t realize until after that was the reason they fell apart, I dipped the second making sure it was carefully placed on the stick. I went to dip it and it fell apart too once it hit the Candy melts. At this point I yell Darn it. Noah said, “Mommy, that is a bad word.” Thinking after two were ruined I couldn’t have just one blimp I dipped it and covered it in sprinkles and watched it fall off the stick as I put it in a bowl for Noah to enjoy. I put the pre-dipped cranes back in the refrigerator for a few hours so, they would survive. I think next time I will keep them in the refrigerator until the last second before dipping. I highly suggest you do so too. It makes it a lot easier and saves you from the heart break of your beautiful creations plummeting from the stick.

After waiting a while I decided the cranes needed to be dipped. I had purchased some thin pretzel sticks to be the arm of the crane. I knew how fast the Candy Melts dried so I figured that I had to dip the cranes and then stick the pretzel in quickly or my cranes wouldn’t have an arm. I thought about dipping them with the pretzel stuck in it already but decided that would probably end badly. I took a spoon and covered the pretzel with Candy Melt. I cut out some yellow little squares and circles for the wheels and windows I attached with water on a little paintbrush. I put them back in the refrigerator to make sure the arms of the cranes were dried. Everyone knows that cranes have strings on them so I thought the pull and peel licorice would be perfect for that. It’s fun to eat too. I just tied it on and it looks really cool.

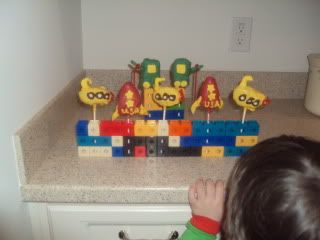
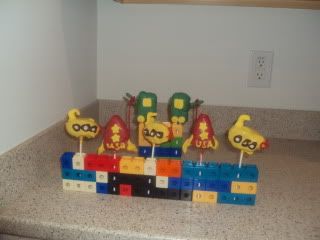
I received a Cake Pops stand in my Cake Pops kit which is really nice; I plan on saving it for a special occasion. I thought since these Cake Pops capture the essence of my little boy, I wanted the stand to be something that was Noah’s. I decided to build a couple rows with his favorite blocks that have holes in them, which are perfect for holding Cake Pops. Noah’s little eyes lit up with amazement when he saw them all done and placed on our display blocks.

I received the Wilton Cake Pops Kit for my contest entry where I could win a $500 VISA Gift card or 9 other prizes. I did purchase additional products for my Cake Pops and all thoughts and opinions and ideas are in fact my own.

Perfect idea for a lil' boy! Love the idea of using legos as the stand -- very creative. :)
ReplyDeletecute idea!!
ReplyDeleteThose are really cute. I'm sure your son loved them, too.
ReplyDeleteThose are wicked awesome! I don't think I could have created something that cool and amazing!! Thanks for sharing the pics and story. GOOD LUCK on winning!
ReplyDeleteAhhh....you and Noah made cute cake pops! You're my cooking hero!
ReplyDeleteXOXOX
So CUTE!!! I love them!
ReplyDeleteVERY neat Shiela. Now the questions is, how long did they last, lol.
ReplyDeleteHow cool! My son and nephews would love that! :)
ReplyDeleteThey turned out adorable, great job!
ReplyDeleteLove those pop! What a great idea.
ReplyDeleteLOVE it! Very creative!
ReplyDeleteThese are adorable! You did a wonderful job. I love how you put them in his building blocks!
ReplyDeleteVery cute..and using the legos is fab.
ReplyDeleteHow cute! You did such a good job! My son loved the TRIOs used as well ha!
ReplyDeleteWhat a great idea!! Love them!
ReplyDeleteThese came out darling! I love them!
ReplyDeleteAdorable! Your very creative :)
ReplyDeleteVery cute! Great imagination you have.
ReplyDeleteThose are so adorable! My son would have loved to have gotten his hands on those. You did an amazing job. Mine would have ended up as lumps of messy cake instead of actual shapes.
ReplyDelete