Showing posts with label cooking with Kids. Show all posts

Wednesday, March 27, 2013

I love Snickerdoodles


I love to make Snickerdoodles. I remember the first time I made them. It was in Mrs. Shrewsbury’s Home Economics class at Clay Jr. High.  She gave everyone a packet of recipes of things we were going to make.  I had eaten snickerdoodles before of course but, I hadn’t made them. It was a really good recipe and I lost my packet of recipes. I thought about going and asking for a new packet even after I was out of jr. high.  I was pretty sad that I couldn’t find the packet anymore.  As you might know I keep cookbooks for forever. I still have my 4-H cook book and my cookbook from when I was 8. I had to find a new Snickerdoodle recipe.  I found my new one on Crisco’s website. I think it was originally on the package of Crisco sticks, which are really convenient when you don’t want to mess with measuring shortening.   We have made these many times. We even made them in the shapes of fish and other sea life.

Here is the recipe from Crisco’s website:

Snickerdoodles
  • 2 cups sugar, divided
  • 1 cup Crisco® Butter Flavor All-Vegetable Shortening
  • OR 1 stick Crisco® Baking Sticks Butter Flavor All-Vegetable Shortening
  • 2 large eggs
  • 2 tablespoons milk
  • 1 teaspoon vanilla extract
  • 2 3/4 cups Pillsbury BEST® All Purpose Flour
  • 2 teaspoons cream of tartar
  • 1 teaspoon baking soda
  • 3/4 teaspoon salt
  • 2 teaspoons ground cinnamon
PREPARATION DIRECTIONS:
HEAT oven to 400°F.
COMBINE 1 1⁄2 cups sugar, shortening, eggs, milk and vanilla in large bowl. Beat with electric mixer at medium speed until well blended.
COMBINE flour, cream of tartar, baking soda and salt in medium bowl. Add gradually to shortening mixture at low speed. Mix just until blended.
COMBINE remaining 1⁄2 cup sugar and cinnamon in small bowl. Shape dough into 1-inch balls. Roll in cinnamon-sugar mixture. Place 2 inches apart on ungreased baking sheets.
BAKE 7 to 8 minutes. Cool 2 minutes on baking sheets. Place on cooling racks to cool completely.


What kinds of cookies do you like?

Sunday, January 9, 2011

Wilton Cake Pops on a Stick Transportation Pops!

Photobucket

I had the opportunity to take part in a contest with Wilton. Wilton is the premier brand of cake decorating and baking products. The contest was to create your own original cake pops. I bet you are wondering what a cake pop is? It is cake on a stick dipped in delicious candy melts. I really want to show you all how to make cake pops. I decided that I would use my adorable little boy as my inspiration for deciding what to make. Noah loves everything having to do with transportation, that’s what I would do. I would make a few of his favorites in to a delicious treat. Since he truly loves them all, picking which ones to do was somewhat difficult. So, I went to the source and asked Noah, he wanted rocket ships, submarines and cranes. He also mentioned blimps but, unfortunately the blimps were too warm and it was like the Hindenburg disaster.

Photobucket

I received a Cake Pops kit from 
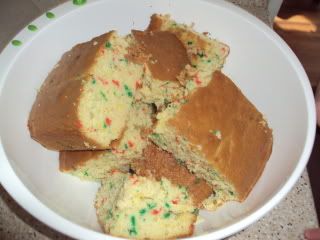
Wilton to help me get started in my first cake pop adventure. Since I am left handed and tried to decorate Noah’s cakes before I was very nervous as they didn’t turn out very pretty. I had confidence in myself and along with my trusty and adorable assistant we were ready to hit the kitchen and start creating. First thing we did was use The Cake Pops on A Stick book to make the special recipe for the cake part. Noah really helped a lot; he poured everything in for me and even helped to stir it all up complete with construction vehicle noises. Once it was baked and cooled, we crumbled the cake.

Photobucket

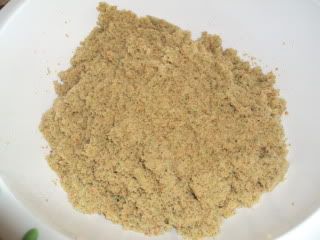
I can honestly say that was Noah’s favorite part. He told me before we started baking that he was going to make me in to a cake pop and tickled me and said crumble crumble crumble. It was very cute. It was fun to crumble the cake up. My Grandma Rose always said that your best tools are your hands, and I agree completely.

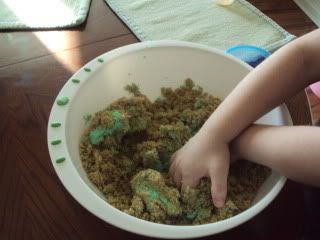
After we crumbled it we added some icing and mixed it up with our hands. I had bought my favorite cake mix and frosting on clearance for 42 cents since it was green holiday icing, we looked like swamp things after we were done. I had to remind Noah, many times not to try and eat it all off his hands.

Photobucket

Photobucket

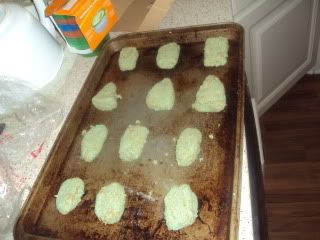
I decided to let it chill for a bit to firm up some, which was a great idea because it was pretty messy before. Once it was firm enough to shape without making a mess. I started making the shapes for the rocket ships, blimps, cranes, and submarines. I put them back in the refrigerator for a couple hours before I dipped the 6 inch sticks in melted Candy Melts to help them stick. Since my cake pops were bigger than the average cake pop I was worried that it would fall off if it didn’t have enough time to chill. I left them in the refrigerator for 24 hours, just to make sure.

Photobucket


I was ready to dip them with my new Chocolate Pro Electric Chocolate Melter. I melted some more red Candy Melts being careful that I wouldn’t waste them, when I was ready for the next color after washing some of the candy melts down the sink, I figured out if I poured the leftovers on parchment paper and let it dry I could reuse it. It peeled off really easily and I also figured out that you have to melt quite a bit to get easy coverage on your Cake Pop. I was able to make it work easily with a spatula on the bottom of the pops so they were completely incased in Candy Melt. It doesn’t take the Candy Melt very long to harden which was a good thing. I dipped the Red Rocket Ships and the Yellow Submarines first. I let Noah pick the colors all of them, since I bought every color of Wilton Candy Melts they had at the craft store.

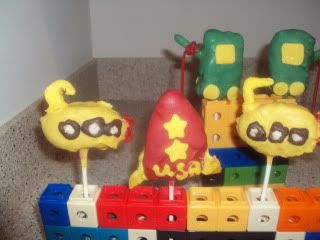
I have always wanted to try out fondant and I thought no time like the present since I wanted to add specific details. I purchased several packages of colored ready to use fondants. I ended up using yellow fondant on all of the Cake Pops. I had also used some little cutters in different shapes. It was really easy to roll out even for me. My crowning achievement was when I put the yellow candy melts in a disposable icing bag and wrote USA on the rocket ships. It is legible even. I am not sure if Julia Child was guiding my hands like in the movie Ghost or what but it was perfect. I was so afraid that the rocket ships were going to be drizzled in yellow candy melt. Thankfully, that wasn’t the case. I was so proud of myself at that moment.

I decided to make the wings of the rocket ship out of fondant. I used yellow fondant as the periscope of the submarine as well. I had some trouble thinking of what to use for the windows on the submarine. I was going to first use the candy eyes that were included in my pops kit turned backwards, that didn’t work too well so, I thought marshmallows would work. I decided to rip them and shape them for the windows. After attaching them I decided, it looked weird so, I melted some white candy melts and put those in a disposable icing bag and drew the windows on. I thought they really needed the porthole covers around them too. I used some melted chocolate chips in another disposable icing bag. Melted chocolate chips are a different consistency than the Candy Melts so it was harder to manage. Noah reminded me that submarines have propellers so I used some pull and peel licorice that I had purchased for the cranes to make it. By that time I had poured out the yellow Candy Melt to harden so I just kind of dipped the back of the pop in the yellow melts and attached the licorice. Two down two to go I thought to myself. I was doing this and it was working for me.

 Photobucket

When it was time for the blimps I went to dip them and since they had been sitting out for a hour or more they were no longer cold. I almost started to cry after I watched the Cake Pop fall apart. I was thinking, it’s ok I have two more blimps. I didn’t realize until after that was the reason they fell apart, I dipped the second making sure it was carefully placed on the stick. I went to dip it and it fell apart too once it hit the Candy melts. At this point I yell Darn it. Noah said, “Mommy, that is a bad word.” Thinking after two were ruined I couldn’t have just one blimp I dipped it and covered it in sprinkles and watched it fall off the stick as I put it in a bowl for Noah to enjoy. I put the pre-dipped cranes back in the refrigerator for a few hours so, they would survive. I think next time I will keep them in the refrigerator until the last second before dipping. I highly suggest you do so too. It makes it a lot easier and saves you from the heart break of your beautiful creations plummeting from the stick.

Photobucket

After waiting a while I decided the cranes needed to be dipped. I had purchased some thin pretzel sticks to be the arm of the crane. I knew how fast the Candy Melts dried so I figured that I had to dip the cranes and then stick the pretzel in quickly or my cranes wouldn’t have an arm. I thought about dipping them with the pretzel stuck in it already but decided that would probably end badly. I took a spoon and covered the pretzel with Candy Melt. I cut out some yellow little squares and circles for the wheels and windows I attached with water on a little paintbrush. I put them back in the refrigerator to make sure the arms of the cranes were dried. Everyone knows that cranes have strings on them so I thought the pull and peel licorice would be perfect for that. It’s fun to eat too. I just tied it on and it looks really cool.

Photobucket

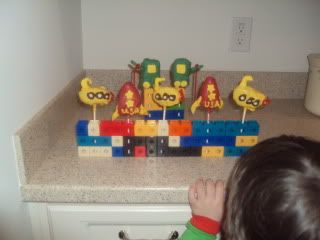
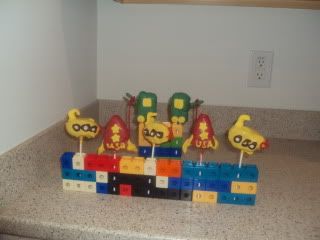
I received a Cake Pops stand in my Cake Pops kit which is really nice; I plan on saving it for a special occasion. I thought since these Cake Pops capture the essence of my little boy, I wanted the stand to be something that was Noah’s. I decided to build a couple rows with his favorite blocks that have holes in them, which are perfect for holding Cake Pops. Noah’s little eyes lit up with amazement when he saw them all done and placed on our display blocks.

Photobucket

I received the Wilton Cake Pops Kit for my contest entry where I could win a $500 VISA Gift card or 9 other prizes. I did purchase additional products for my Cake Pops and all thoughts and opinions and ideas are in fact my own.

Wednesday, June 23, 2010

The Original 5-in-1 Tasty Baker Review

Photobucket

Noah loves to eat breakfast foods. He loves pancakes a lot as I have mentioned before. He also loves shapes. He will make his food in different shapes and when I had the opportunity to try out an Original 5-in-1 Tasty Baker, I knew Noah would think that it is the coolest thing. The Original 5-in-1 Tasty Baker is made by LC Premiums, Ltd., who also makes the Pop Art Toaster. The Tasty Baker is an electric appliance that you use to cook pancakes, muffins, little cakes, brownies, and biscuits. The possibilities are really endless. It all cooks it in 1/3 of the time, which can be a total life saver sometimes. They also have a Disney character one.

The best part of it is that there are molds in it that you can make shapes like trains, smiley faces, blocks, hearts and even dogs and cats. Noah and I love to cook together too. He loves to pour ingredients in the bowl complete with sound effects of trucks. He also loves to mix and he asks me if he can be a cement mixer. Of course I can’t tell him no. He is a great little helper in the kitchen. I usually just do the actual measuring and help with the mixing and of course if the oven is used or in this case the Original 5-in-1 Tasty Baker.

I couldn’t wait to receive The Tasty Baker. I was so excited because I knew Noah would be so happy to eat train shaped pancakes. We tried it out the next morning and made pancakes. I had my little assistant in the kitchen with me ready to get to work. We just used packaged pancake mix and it worked well. The pancakes were so moist and delicious. Cleaning up was really easy too. I love to cook and bake but hate to clean up afterwards. So, I was impressed at how easily I could just wipe down the plates and it was ready for the next time.

Shortly after we made the pancakes, we decided we were going to try and make brownies with it. I love brownies but we have trouble eating an entire pan ourselves. It seems like more often than not there are a few left that end up getting thrown out. I love that you can make individual ones and as many as you want. Maybe you want a little snack but don’t feel like making that entire pan, but really want brownies, then The Original 5-in-1 Tasty Baker is for your family. The brownies were great too. Noah and I really enjoyed talking about the different shapes we were going to make. It is also great for his creativity and imagination because it will spark conversations and lead to many smiles and laughs. The brownies were great too. Noah loves brownies so he kept asking for more. I had to put them up in the cabinet or he would eat them straight off the counter.

I really like The Original 5-in-1 Tasty Baker and I am glad that it is now added to my kitchen and will continue to use it in my daily life. I am a very busy mom of an adorable little boy who always keeps me on my toes so it is great to have an appliance that is practical and easy to use. It allows me to have more time to spend with my son and enjoy yummy food with him and bond over what we make and eat together. There are also a lot of recipes on the website that I can’t wait to try out.

For more information please visit The Pop Art Toaster website. Also check out the Pop Art Toaster for a fun and hip way to enjoy your toast.

You can purchase The Original 5-in-1 Tasty Baker Here

Thank you to LC Premiums, Ltd. for sending me a complimentary The Original 5-in-1 Tasty Baker for my family to enjoy.

Sunday, March 14, 2010

Celebrate St. Patrick's Day with Duncan Hines

It is almost St. Patrick’s Day, growing up we celebrated it with wearing green so I wouldn’t get pinched at school. We also received a small little treat because I am extremely Irish. I remember looking for rainbows on St. Patrick’s Day and looking for pots of gold when I was little. I am Irish from both sides of my family. My mom’s parents are both of Irish decent. My Grandma Rose’s family came over from Ireland on a ship called the Spotted Cow.

On my dad’s side is where I get most of my Irish heritage. My Grandpa Bill was born in Ireland and all his family is from Ireland. My dad was also born in Ireland. So, I am more Irish than I am anything else. I am first generation American. I am the second person in my dad’s entire family to be born in America with my sister being the first. So, to me St. Patrick’s Day is not just an excuse to get drunk but it reminds me of my heritage and family.

I thought it would be fun to share some recipes for some delicious St. Patrick’s Day treats from Duncan Hines with you guys. You all know how much Noah and I like to cook. I have two recipes to share with you that Duncan Hines has developed in celebration of St. Patrick’s Day. The recipes are Leprechaun Key Lime Cake and Clover Patch Brownies.

Leprechaun Key Lime Cake
Photobucket

Try your luck with our cool, creamy, refreshing Leprechaun Key Lime Cake. There's a splash of lemon-lime in every bite thanks to Duncan Hines Lemon Supreme Cake Mix, lemon pudding, lime slices and Key lime juice.

Ingredients:

Cake:
• 1 pkg Duncan Hines Moist Deluxe® Lemon Supreme Cake Mix
• 1 (3.4 oz) pkg lemon instant pudding and pie filling
• 4 large eggs
• 1/2 cup vegetable oil
• 1 cup water
• 1/4 cup Key lime juice

Glaze:
• 2 cups confectioners' sugar
• 1/3 cup Key lime juice
• 2 tbsp water
• 2 tbsp butter or margarine, melted

Garnish:
• additional confectioners' sugar, lime slices and fresh strawberry slices

Baking Instructions:
1. Preheat oven to 350°F. Grease and flour 10-inch Bundt or tube pan.
2. For cake, combine cake mix, pudding mix, eggs, oil, 3/4 cup water and 1/4 cup Key lime juice in large bowl. Beat at low speed with electric mixer until moistened. Beat at medium speed 2 minutes.
3. Bake 50 to 60 minutes or until toothpick inserted in center comes out clean. Cool in pan 25 minutes. Remove cake from pan onto cooling rack. Return cake to pan. Poke holes in top of warm cake with toothpick or long-tined fork.
4. For glaze, combine 2 cups confectioner's sugar, 1/3 cup Key lime juice, 2 tablespoons water and melted butter in medium bowl. Pour slowly over top of warm cake. Cool completely. Invert onto serving plate. Dust with additional confectioner's sugar. Garnish with lime slices and strawberry slices, if desired

Clover Patch Brownies
Bring a bit-o-luck to the kitchen by creating these shamrock-covered Clover Patch Brownies using our Duncan Hines Chewy Fudge Brownie Mix.
Photobucket

Ingredients:
• 1 pkg Duncan Hines Family Style Chewy Fudge Brownie Mix
• 1 pkg pre-made marzipan or fondant
• green food coloring
• green toothpicks

Baking Instructions:
1. Bake brownies according to instructions on box. Remove from oven and let cool. Cut brownies into squares.
2. Meanwhile, knead green food coloring into marzipan or fondant until desired shade of green is achieved.
3. Form small (1-inch) 3-leaf and 4-leaf clover shapes out of fondant or marzipan. Be realistic and make a lot more 3-leaf clovers than 4-leaf clovers.
4. Stick clover shapes on top of green toothpicks.
5. Insert little bunches of clovers onto each brownie.

Duncan Hines is available in your local store's baking aisle.

I hope you try out one or both of these recipes with your little leprechauns. It will definitely add some Irish fun to your day and maybe bring you some good luck too. I wish everyone a Happy and Safe St. Patrick’s Day. Don’t forget to wear green or you might be pinched by a mischievous little leprechaun.

Thank you to Duncan Hines for providing me with a couple mixes to try out these recipes with my son.

Saturday, January 9, 2010

New series starting soon on Sheilacakes!

I wanted to share with you guys some exciting news about what is coming up on my blog! I decided since Noah loves to cook, I would do a series about cooking with kids featuring products kid friendly cooking items and products that make kid friendly foods. I will also be including kid friendly recipes and cookbooks.

Noah loves to help me in the kitchen. He is in charge of dumping the ingredients complete with dump truck noises, he also likes mixing. He talks about cracking eggs, I haven’t been brave enough yet to let him try one but, I am sure I will soon. Of course I will share that experience with you. He likes to talk about what we have made together in the past. His favorite to date has to be the M&M cookies we made. I didn’t have a recipe that used regular M&M’s and I couldn’t find the minis or the baking ones so I had to do a little rough justice and wing it. It worked out perfectly just as I suspected. He asks me every other day if we can make more M&M cookies. We still have some in the freezer.

Yesterday, we made Triple Berry Muffins from a pouch; I learned that Noah loves muffins by sampling one at the store once. I was going to buy muffins but then I thought muffin mix is really cheap and homemade is better, because I can add my secret ingredient. I have a silicone mini muffin pan that I use. The muffins come out to be what I call baby size. They aren’t big and they aren’t the next smaller size. One pouch makes 6 regular sized muffins, using my pan it makes 24. So, hopefully that gives you an idea on how small they are. I think they are the perfect size for Noah. They aren’t too big and they are not messy! Those are both important when you have a three year old.

I hope this series will help me create many fun filled memories and instill a lifelong love of cooking for Noah. I also hope that it will encourage you all to get your kids in the kitchen and provide you all with the knowledge and resources to do so.

If you have a kid friendly cooking or baking product, or a product that makes food that kids would enjoy and want to be featured in my awesome series, please use my contact form or email me. I am really looking forward to my series and I hope you are too!

Thursday, November 5, 2009

eebee's Mix and Mash Review

Photobucket
I have said this before but I really love to cook. I am a great cook and it is one of my passions, in my quest to teach Noah to cook. I had the opportunity to review eebee's Mix & Mash Adventures dvd and book. The book and dvd shows you how to cook with your baby. It is something that toddlers can handle and even babies. Yes babies. It is really cool. Most people would think you couldn’t cook with your baby but eebee makes it possible. The recipes are for 6 months and up. A few of the recipes are for older babies. Your child is the chef and you are the assistant. All of the recipes are healthy and really easy. One of the steps your child does is shake. Noah loves to shake things. It is so cute because he says “shake shake shake”.

This is so cool. I love being able to share this with my son. I often find myself wondering what he can do in the kitchen with me. This book and DVD have not only opened me up to new recipes but new ideas as well. Noah and I will be trying out some of the recipes together and I am sure we will laugh and laugh while we are making some delicious recipes that are not only fun to make but healthy too. These recipes will be something we will enjoy for years to come.

Noah and I decided to make the blueb-eebee soup. Noah helped me pour the blueberries in the bowl and add the water and he even pressed the start button on the microwave with my assistance. We used some yogurt we had in the refrigerator too. Noah loved cooking with me. He was laughing the whole time. We sang songs while we cooked together. He loves to explore in the kitchen and through this book we will be able to come up with more ideas that even my little boy can do.

Noah and I loved the taste of the blueb-eebee soup. Noah said mmm it’s delicious. He asked to make it again later but we were out of blueberries. We only made half a recipe. Next time we will make a whole one. I have to remember to add some of the ingredients on my grocery list. Something else that is really cool about the book is there are little nutrition tidbits with each recipe. I now know why blueberries are blue. Do you?
For more information on eebee’s Mix & Mash Adventures please visit the website. eebee’s Mix & Mash Adventures in the Kitchen for baby and you is available at Barnes and Noble bookstores nationwide.


Thank you to eebee for sending me a complimentary copy of eebee’s Mix & Mash Adventures.

Sunday, October 11, 2009

My favorite cookbook as a kid

Photobucket
I am a big advocate for cooking with your children or grandchildren. I grew up in the kitchen. I really loved helping my mom and grandma cook in the kitchen. I was an expert cook by the time I was in 3rd grade. I could cook better than most adults. I would make bread from scratch and all sorts of delicious treats and meals. I find cooking very therapeutic. I am going to teach my son to cook. He has already shown interest in cooking. He likes to stir. He helped me make his birthday cake this year. Cooking with your kids is a fun way to bond with them in the kitchen and through food.

When I was 8 years old, I begged my mom for a cookbook called Kid’s Cooking by Klutz that came with my own set of measuring spoons. I love that cookbook so much. It has always been one of my favorites. Yes I still have it to this day. I still use it too. The measuring spoons are long gone though. I lost them somewhere during a move. Well, I think..I still have the Tablespoon somewhere maybe. This book has the best brownie recipe. In my eight year old handwriting it says “World’s best brownie recipe” complete with little hearts. You know if there is hearts it has to be awesome.

There are all sorts of recipes that are broken up by meal types and desserts. It even has recipes for play dough and face paint in the non-edible section. My mom and I used to joke about some of the recipes that have pictures with a “grown up with a knife”. We always thought that the pictures were silly looking. I still chuckle when I see one of the grown ups with a knife.

This book is a perfect cookbook for kids. I think it is something that all kid chefs should have. The recipes are easy to follow and are worded so kids will understand. I have had this cookbook for 20 years and it is still in pretty good condition minus the food stains from using it so much. I was looking at it online and now they have easy to wipe off pages. I would never trade this cookbook in for a newer model. Out of all the cookbooks I had a child this one will always remain as my favorite.

My son will use this cookbook too. I am not sure if I will get him a new copy or pass on mine when he turns 5. That will have to be decided at a later date. I have so many treasured memories with Kid’s Cooking. Every time I look at this book, I remember them. So as the holidays are approaching please remember Kid’s Cooking by Klutz for your young chef. It is a great learning guide. It is only $14.99 so it is an economical present that hopefully provide many many years of memories like it has for me.

This not a review. This is just something fun I decided to write.