Showing posts with label how to. Show all posts

Tuesday, June 4, 2013

Make your Website Mobile with BeMobile4U


Most everyone has a smart phone. So, surfing the net on your phone is a really common thing to do.  I know that I will go days sometimes without touching my computer. If I am traveling I will just use my phone. I can check email, go to any site I want in the palm of my hand. It has been really convenient for me, especially when my computer decides that it wants to stop working. It is great because I can be connected wherever I am, any time. I may be a little too attached to my phone at some times. I know when to put it down but if I am at the grocery store waiting in line sometimes I like to check my email or look at websites. It is also a good thing to have when you are out and are looking for a specific restaurant to eat at.  Sometimes Noah wants to go to Steak n Shake and since I am fairly new to the area, I don’t know where they all are or how to get there.  So, it is extremely helpful.

I have been blogging for over four years and using the internet for over twenty years. One thing I have noticed since I have had a smart phone and even when I had a cell phone with internet, not every site is mobile friendly.  Mobile friendly means that it has a mobile version. It is optimized for mobile use.  Sure you can go to a website, but it can be extremely hard to read if it is the full site. A mobile version makes it really easy to navigate and look for things.  I think that it is very important to have a mobile site to cater to your visitors.  I know that if a website is hard for me to read and navigate, close the site.  I don’t have time to scroll and shrink and squint to find the information I am looking for.  I know that my mom for example wears reading glasses, she can’t see small print. Sometimes the layout is all messed up or the font is funky and she is just like I can’t read this.  You are losing customers or readers by not having a mobile site.  You are losing money and business.

How do you make your site mobile?  I found a great website called BeMobile4U. It is really easy to use. You just put in your website and they do all the work for you. You embed java script code on your site and you are now mobile. It is a must have to stay in business in this day and age.  They even give you a QR Code and your customers can scan it and it takes you to your mobile site. I have seen QR Codes on everything from packages to on the side of buses.  BeMobile4U has three plans to suit everyone’s needs. They have a Mobile Free Plan, Mobile Smart Plan and a Mobile Pro Plan.  The Mobile Free plan would be good for a basic informational site.  The Mobile Smart Plan and the Mobile Pro Plan have some extra awesome features like click to call, click to email, click to map which make it easy for your customers to get in contact with you.  Communication is the key to a successful business.  You can even have AD Sense on your mobile site, which helps you also make money on your mobile site. It isn’t just limited to computers now.  I think that some companies don’t have a mobile site because they don’t know how to get one. You don’t have to hire some IT guy to reconfigure your site, just go to BeMobile4U and they will take great care of you.  The Mobile Pro Plan is only $25 a month which is very affordable and you can focus on other things and bring in new customers.

For more information please visit BeMobile4U

Friday, November 2, 2012

How to Shop for the Perfect Coffee Table


Almost everyone has a coffee table.  It is a great place to put magazines and to serve drinks with a coaster. You can kick up your feet after a busy day or display art.  I think that it is essential to have in your family room or living room. Growing up we had multiple coffee tables.  We had them in both the living room and family room.  My most interesting coffee table would have to be when I was married. My ex and I had a large speaker as our coffee table.  It was actually a working speaker that was hooked up to the tv and stereo.  It was pretty cool. I didn’t really mind that it was a speaker. It worked as a coffee table and we didn’t have to put things on the floor to spill them.  It wasn’t my idea.

When you are shopping for the perfect coffee table you have all kinds of options. They come in every color and shape so how do you know what your perfect coffee table is? There are so many things to consider.  
Size is important. If you have a huge coffee table and a small space or couch a large coffee table will become an eyesore or something you will constantly bump in to. Ever hit your leg on a coffee table? It hurts so much.

You also have to think about if you have kids what would be the safest option for you.  Although glass coffee tables are pretty, having that much glass around a small child around who probably jumps off the couch or does tricks over the arm of the couch is probably going to get hurt. 
Another thing to consider is shape. What shape would you like? I know I have seen coffee tables in the shape of yin-yangs, hearts, and square ones, circle ones any shape you want. You could even have it custom made if you wanted. If you have a sectional your best bet would be a round one so it fits in the area.

You also need to decide what color you would like. What is your favorite color? What color is your paint? What color is your other furniture?  All things you would want to think about.
Style is important.  Do you want traditional, Mission, Chic or something else?  You can find whatever style you want even if it is different.  I personally like mission style. My furniture was all mission style for a while.  I know that is an upgrade from a speaker.

The last thing you need to decide is if you want it to be multipurpose. Do you want drawers? Do you want built in features like a server? My coffee table has drawers and baskets. It’s great for storing tv guides, recipes, remotes and office supplies. Now if Noah would stop getting in it and taking envelopes and tape out that would be great.

I hope I gave you some great pointers and things to consider while shopping for a coffee table.

Secrets to Aging Gracefully


A lot of women are concerned about growing older; I think that some believe that if you get older you lose your beauty. I don’t think that is the case because no matter how old you are, you are beautiful.  I don’t think it matters how long you have been on the earth, or if you have wrinkles or grey hair you are still beautiful. My grandma Rose was beautiful until she passed away; she had grey hair and wrinkles. I used to gently pinch the loose skin on her hands when I was little.  Now in the days of plastic surgery it is like if you have one wrinkle you need to torture yourself to get rid of it.  I am not really sure what the point of becoming a human pin cushion to look beautiful is.  I believe you can age gracefully without the use of needles and being cut open and poked and prodded.  I thought I would share some ways for aging gracefully.

Always wear sunscreen when you are outside. You can get sunburn when it is cloudy. You can damage layers of your skin and get sunspots from the UV rays.  Not to mention you can get skin cancer. Sunscreen will also help you moisturize your skin.

Eat foods rich in antioxidants. The antioxidants can protect your body from diseases and help you feel good.  

Eat foods rich in vitamin A to protect your vision, as you get older your eyes are extra important as your vision can start to go.  Eating healthy is just plain important, I don’t think having a treat every now and then would be a bad thing.

Take a multivitamin or vitamin supplements to protect your body and your bones.

Drink a lot of water. I know that is simple advice but water makes you feel better. It flushes out your toxins and helps curve hunger.

Get some sunlight. I don’t mean lay out in the sun but get some sunlight. The sun makes you happy. If you live in an area where the sun doesn’t shine a lot when it is colder, you can get a machine that makes artificial sunlight. I know that when I am having a bad day if I spend some time out in the sun I feel better.

Get exercise. I believe that you are only as old as you feel. I think that getting out and doing those things you enjoy can be good for you. It helps you stayin shape, and if you sit around and do nothing you are going to miss out on those fun things. Please know your own limits but I don’t think age makes you destined to sit in a chair to grow old.  Even a walk with a loved one is fun. It helps create long lasting memories. I still remember walking to the store with my Grandma Rose when I was a little girl and I wouldn’t trade those moments for anything. One of my favorite quotes is “Get Busy Living or Get Busy Dying” – The Shawshank Redemption.

Spend time with friends and family; surround yourself with your loved ones. You would be surprised how young you can feel when you are around those you love. Especially children, you can become a big kid in a matter of moments.  Get together with the girls and laugh until you snort or cry.  Make memories.
The most important tip I can give you for aging gracefully is simple. Enjoy life. My best friend’s dad is always saying enjoy. So, I ask you to just enjoy life.  Don’t worry about growing old, just enjoy now.

So what if you get wrinkles, in some cultures wrinkles mean beauty and grace.  Each wrinkle you have tells a story.  They are there for a reason. Instead of getting rid of them why not just love them.  They are a part of you.

Saturday, April 7, 2012

How to Make Foaming Soap


I love Bath and Bodyworks soap. I also have a five year old that loves to pump the foaming soap and waste it sometimes. It can get expensive to keep buying soap, and I really need some more and I am not able to make it to Bath and Bodyworks for a while. I already add a little water when it is getting low. I thought since it is just soap I could fill them with a little bit of body wash and add some water. I have body wash that isn’t enough to use to wash myself, so I poured that in the soap container. So I made some new soap. I feel kind of like Tyler Durden.

Here is how you do it:

Take an empty foaming soap container and the body wash of your choice, you can also use hand soap or shampoo and put some in the foaming soap container. Just make sure it is liquid and not the creamy lotion kind, because I have added water to that before and it is just a mess. I would also stay away from the kinds with the little scrubbing beads because they will clog the foamer.


Add some water and mix it up. It is best to fill it before you shake it so you get more use, if you shake before like I did the bubbles will eventually dissolve.
Put the lid on and Voila! Your soap container is full again and you are able to re-purpose the container and that little bit of soap or shampoo or body wash that isn’t really usable.

You can also refill your travel body washes up with more of the same scent to save on buying more travel body wash or if you don’t have more of the scent, you can always use it to make foaming soap.

It’s good for the planet too.

Friday, August 26, 2011

How Do I Lose My Stomach Fat?

I have always have had a little stomach fat, I remember it was referred to as an inner tube, I am not sure that was the best thing for my self esteem because I wasn’t fat, I just didn’t have a six pack or wore size zero. Before I was pregnant with Noah I wore a size seven. I didn’t weigh too much I just had hips. I only weighed 116 pounds. I gained 50 pounds during my pregnancy, I was hoping it would come off quickly. Noah will be 5 in a few weeks and I still have most of my pregnancy weight. I have spent some time looking online how to lose stomach fat. I really don’t consider myself overweight. I just need to lose some of the fat and tone up so I am not so squishy. I have a normal BMI, but I would feel better about myself if I would lose some weight, my life is just so hectic to where I don’t really have time to work out. I don’t even really like working out. I have never been a runner. I hated gym class. I am not athletic, I was that kid that didn’t excel at gym class and didn’t play any sports in school.

I have been about the same weight for a long time. I am not really losing any weight or gaining any. My weight stays in a scale of 3 or 4 pounds difference. So I am thankful that I am not gaining any weight, which is a great thing. Maybe someday I will have a six pack. Right now I am focusing on healthy eating and exercise for Noah. His growing body needs healthy foods and lots of exercising and running around outside.

How do you work out or try and loose that annoying stomach fat?

Monday, November 22, 2010

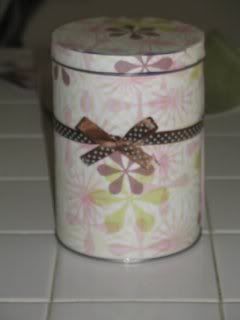
How to Alter a Tin


Thanks to Scotch(R) Double Sided Tape for sponsoring my writing about crafts. Add your comment below to be entered for a chance to win free sample rolls to help with your upcoming holiday needs.

I really enjoy doing crafts. I have found that double sided tape works really well when you are taping pictures on scrapbooking pages. As someone who has broken every tape runner she has owned, I think that double sided tape works really well. You don’t have the extra bulk of using normal tape in a loop. In my opinion unless you are using something to purposely make the picture pop out it should be flat.
I wanted to share a quick and easy craft with you. I thought I would show you an easy way to alter a tin. Maybe it is an old holiday cookie tin or popcorn tin or a coffee tin, almost any tin will work. I bought some little tins that I keep some of my crafting supplies in.

Photobucket

You need:
2 pieces of Patterned Paper (same print)
Double sided tape
Any sized tin
Scissors
Ruler

First take your paper and wrap it around the tin. Make a mark on your patterned paper on the white side at where the groove at the top. This is so you can put the lid on your tin. Take a ruler and make a line horizontal and cut across. You might need another piece of paper to cover the rest of your tin depending on the size. Remember to keep the lip of the tin exposed because it will not matter once the lid is on.

Carefully put double sided tape on the paper and line it up around the tin. I find that it works better if you stick the paper in the metal rim at the bottom. It not only looks cleaner but it helps it stay. If you need to cover more of the tin, just cut out a strip of paper to fit the area and tape. It can be the back of the tin.

Trace the top of the tin’s lid and cut it out. You will also need a thin strip of paper to go around the bottom of the lid. Tape the paper to the lid.
You can decorate any way you would like.

Please learn more about Scotch(R) Double Sided Tape and other Scotch(R) Products, and join the conversation on the Scotch(R) Brand Facebook Page
and via Twitter.

I was selected for this sponsorship by the Clever Girls Collective, which endorses Blog With Integrity, as I do.

I have a giveaway for you.

Ten (10) Winners will each win a roll of Scotch Double Sided Tape.

Main Entry: Tell me what you think of my craft idea

This giveaway will end Friday November 26th at 11:59 pm ET
This giveaway is open to US Residents ONLY

Thursday, April 29, 2010

Sheila's Beer Battered Onion Rings Recipe


I love onions; they are one of my favorite foods. So, naturally onion rings are on the top list of foods I really enjoy. Now onion rings can come in a couple different ways. There is breaded onion rings that have a thick coating where the onion always seems to fall out. I am not a huge fan of them honestly. I have to be in the mood for that kind, which isn’t often. Beer battered onion rings are the way to go for me. I love to make them at home. I actually bought a deep fryer just to make onion rings. It is the only thing I have ever made in my deep fryer. This is the recipe my mom used when I was younger. I have many memories of her making them and us eating them. I thought I would share with you guys the recipe. It is really easy but it is kind of time consuming but extremely worth it in my opinion.

Here is a list of what you will need:

Deep fryer

Can of shortening

Few big onions

12 ounce bottle of the beer of your choice, I buy whatever is on sale usually Coors Light

1 1/2 cups of flour

Salt

Step 1: in a large bowl combine beer and flour. Let it sit for 3 or 4 hours. Resist the urge to stir it after you have mixed it all together. The batter will turn frothy.

Step 2: Put your shortening in your deep fryer and let it heat to the proper temperature. Please consult your deep fryer manual.

Step 3: Cut onions in rings. I usually do thicker rings because when the onion cooks it gets thinner. Separate the rings.

Step 4: Coat rings in the beer batter thoroughly.

Step 5: carefully place the onions in the deep fryer. I usually use a fork. Watch out for splatter and steam.

Step 6: When the onion rings are starting to cook flip them over with a fork or tongs. I always wear an oven mitt to protect my hands. When they are golden brown they are done.

Step 7: Take out onion rings and place on a cookie sheet covered with newspaper and paper towel. Immediately salt both sides.

Repeat steps 4 through 7 until you have the desired amount of onion rings

You can reheat them in the oven for a few minutes at 350 degrees on a cookie sheet
with paper towel.

If you want to make more batter remember it is equal parts beer and flour.

Enjoy!

I hope you try out this onion ring recipe and let me know what you think.

Saturday, March 27, 2010

How to Roast Garlic


I love Garlic. I have been proclaimed the Garlic Queen. We went to Garlic Fest in 2008, in Delray Beach. Noah is a graduate of Garlic University. He has a diploma and all. I love Garlic in every way shape and form. Noah loves garlic too. I definitely prefer fresh garlic and not the kind that comes in a jar. I love roasted garlic. I know some people like it on crackers; I prefer it on Cheddar Pringles. When you go to a restaurant you can pay like 5 or 6 dollars for a head of roasted garlic and some bread or crackers. It is really easy to make. I thought I would do a post on How to Roast Garlic.

Step 1: Preheat the oven to 425 degrees.

Step 2: Cut the tops off the head of garlic making sure all of the cloves are exposed. You might have to do a little grooming for the ones that don’t get exposed during the initial cut.

Step 3: Get a piece of aluminum foil (big enough to wrap the head of garlic) and place the garlic on it. Drizzle the exposed cloves with Olive Oil and wrap tightly. I think the pull up and twist method works the best.

Step 4: place in a little pan or loaf pan incase of leakage and put in the oven for 45 minutes.

Step 5: Let cool a little and remove the cloves and enjoy.

Now for some hints:

Tight heads work the best.

Don’t break or remove the skin of the garlic before roasting.

To help the garlic cool faster unwrap the aluminum foil.

One head of Garlic can feed two people maybe more depending on how much you love garlic. I usually eat one by myself.

See how easy it is? Now you can have roasted garlic anytime you want.

Sunday, November 15, 2009

How To Make Your own Snuggie!

It seems like almost everyone has fallen love with Snuggies. You know what I am talking about those as seen on TV blankets with arms. I brilliantly figured out how to make my own Snuggie. I thought I would share it with all of you.

I am sure everyone has seen the commercials. I saw the Snuggie inventor on TV on How’d you get so rich? On TV Land. The cool thing about my homemade snuggies is you can make it with whatever print or color you want. It is really simple and fun. You probably already have the materials at home.

Here is a picture of one of my homemade Snuggies!
Photobucket

So why pay 20 dollars when you can make one for the fraction of the cost? That is just crazy if you ask me.

Materials you need:

A robe

Take the robe and turn it backwards and insert your arms in it. VOLIA! You have a Snuggie!
A snuggie is just a robe turned backwards! I told you I am BRILLIANT!

Thursday, October 15, 2009

Monster Clips!!

I made these a while back and I thought I would do a how to for those who would like to make their own. They are really easy to make and are a lot of fun. They are embellished paper clips for all to enjoy. Just in time for Halloween or for your favorite little monster. You could use then for book marks too!
I decided to vlog while making these


Here are the supplies you will need:

Thin colored foam sheets (I got mine at a dollar store)

Scalloped circle punch – I have one from Stampin Up!

Jumbo Paper clips- not the standard size

Double sided tape

Glue dots

Googly eyes- two for each Monster you want to make.

1.punch out some scalloped circles. Punch out two for each monster you want to make.

2. Using double sided tape carefully tape the paper clip to one of the foam pieces half way down. Make sure the part that you insert paper in is down.

3. Using little pieces of double sided tape on the side where the paperclip is to secure the top of the monster.

4. Press the top foam piece on top

5. Using glue dots put on the googly eyes

And Ta-Dahh! you have Monster clips! I hope you enjoy this craft as much as I do!